DIGITAL CAMERAS & SCOPES

While you can use a digital camera by itself and find it
quite useful, it also makes a great addtion to any tool that
you use to improve your ability to see, such as magnifing
glasses, spotting scopes, binoculars, microscopes, and
telescopes. The main accessory you need to take effective
digital images with these scopes is a tripod. A good tripod
that is easy to position will allow you to integrate the
digital camera with most of your other optical instuments.
Next I find that a fixed focus, or focus free, camera, versus
one that has a focusing system, with an active display screen
is the easiest to use with optical instuments. Trying to
focus the scope along with the camera can be challenging
(after all how many hands do you have?). Also it is important
to remember that when using some form of scope or lens
system, you turn off the camera's flash. It's always a good
idea that whenever you use a digial camera with any form of
scope to use an outside power adaptor for the camera. The LCD
screens use a lot of battery power, and when on batteries
most cameras will regually turn themselves off after a few
minutes when they are not taking pictures.
SPOTTING SCOPES,
BINOCULARS, & MONOCULARS:
Using a digital camera with a spotting scope you just put
the camera lens right up to the rubber gasket of the scope,
and then focus the scope's lens. Use the display screen of
the camera to check your image. It is possible to hold the
scope over the lens while holding the camera, but again the
use of a tripod for both the scope and the camera makes it
much eaiser.
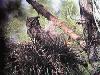
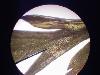
| This image of nesting owls was
captured from the second floor across a parking lot
using a spotting scope and a relatively inexpensive
digital camera. |
click to enlarge
|
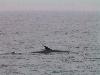
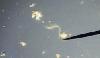
| This image of a right whale was taken
on a whale watching boat off the coast of Connecticut
using a Casio QV 10 and a monocular. |
click to
enlarge
|
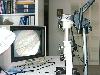
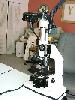
MICROSCOPES
When using a digital camera with a
microscope always position the digital camera on a tripod.
First use your eyes and the microscope to find and focus on
an object, then position the digital camera over the eyepiece
and move the camera or scope until you can see the image on
the camera's screen. Lighting an object from above or outside
usually works better than using the lighted stage. This is
because the amount of light coming from under your object
shining right up into the camera causes a whiting or flare
effect, making it actually harder to see your object. You
also may want to create a light shield from a paper towel
tube, old film can, or foil to prevent light from reflecting
off the surface of the eyepiece lens and into the camera. A
great option on some cameras is a live video out feature that
allows you to display not only on the small LCD screen on the
back of the camera but also onto any television (through an
RCA jack) or video projector.
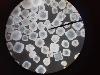
| Salt crystals at 40X and 100X, lit
from above using a Casio 780 and a standard school
microscope. |
click to enlarge |
| Fern leaf at 40X and 100X, lit from
below using a Casio 780 and a standard school
microscope. Since most of the leaf blocked the light
there was no noticable flare effect. |
click to enlarge |
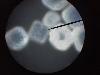
| Using a small dish to hold the pond
water, a small aquatic worm at 100X, the whole view
and just the worm with the rest cropped out. |
click to enlarge |
| A paramecium viewed at 100X lit from
above and then from below. Notice the light leveling
problem when lit from below. |
click to enlarge |
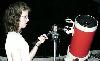
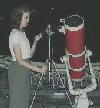
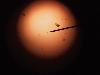
TELESCOPES
When using a digital camera with a
telescope, again, always position the digital camera on a
tripod. Line up your scope, view and focus the telescope
using your eyes (if you wear glasses, do your focusing with
them on). Once you have an object in focus, position the
digital camera over the eyepiece (you may need to move it
back a bit, depending on the type of eyepiece). When the
object is centered in the LCD screen, just push the shutter
to capture the image. If your camera supports a remote
shutter switch, then use the remote to reduce motion of the
camera, or shaking of the telescope.
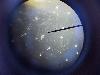
| This image of the moon was captured
using a Casio 780 (fixed focus) and a newtonian
telescope (see above) |
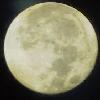
click to enlarge |
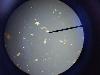
| This picture of Jupiter and its moons
was also captured using the Casio 780 and a newtonian
telescope. |
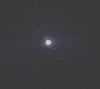
click to enlarge |